This article contains 4 versions of the Digisound 80 VCO so you can choose which one suits your needs best. They're all variations of the same circuit.
1 - Normal DS-80 VCO for Kosmo size (+/-15V or +/-12V)
2 - Eurorack sized version of DS-80 VCO (+/-12V)
3 - Kosmo sized DS-80 VCO with alternative PWM input mixer. (+/-15V or +/-12V)
4 - Eurorack sized DS-80 VCO Bi-Polar version with alternative PWM input mixer. (+/-12V)
- Extra Triangle to Sinewave converter can be added.
There are PCBs available for this VCO. See 'PCB Service'
The +/-15V power options are included because when I started out building my synth I had made a powersupply that gave dual 15 aswell as 12 Volt so I built the VCOs for 15V as the old schematics said, but I should have stuck with only a dual 12V supply. Much easier.
INTRODUCTION:
More than 6 years of experience and feedback from people who built this VCO have gone into this article to bring you what I think is the best DIY VCO stripboard project on the internet. Many hundreds of people have now built this for Kosmo aswell as Eurorack systems and in the beginning people were having problems with using this circuit on a dual 12V powersupply but they came up with solutions and all of those solutions have been weaved into this article. I have not had many people reporting issues in the last few years and if they did it was due to some mistake or other, made in the building proces.
So I hope you enjoy building this awesome sounding VCO.
I recently added a stripboard layout especially for a bi-polar version of this VCO for Eurorack systems. (+/-5V instead of 0-10V waveform output amplitude)
Not only is this VCO easy to build, it can actually be tuned easily too. Before I found this, I used the datasheet VCO schematic for the AS3340 using the stripboard design from the LookMumNoComputer website. I could never get that VCO in tune over a wide range of octaves and I couldn't get it to play really deep tones either. I think the fact that the HF tracking was left out had something to do with that because when I added that feature to the LMNC VCO the low notes came back.
This 'new' design however changed all that! After looking through all sorts of VCO schematics I decided to go for the Digisound 80 design and I added the triangle- to sinewave converter later on as a separate stripboard. (Adding a sinewave can be useful for adding more bass to your audio. Adding a sinewave from the same VCO to a filter input will give you more bass because sinewaves aren't alterred in the filter, they're just summed to the input.)
But we are concentrating first on the main VCO and the Tri- to Sinewave converter is discussed at the bottom of this article.
I can tell you, these VCO's (I built seven so far) sound soooo much better than the Datasheet VCO. Of course it's the same waveforms but the range is so much bigger (0.1Hz to 50kHz!) and tuning this VCO is a breeze! And this Digisound design isn't even that different from the Datasheet design. Except for the extra trimmer, the Hard Sync options and a few resistor value changes, but this makes all the difference in the world. As a first time synth builder and having been into modular synths for only 6 months (at the time of first writing this article) this VCO was a real revelation for me. It can even be used as a Low Frequency Oscillator, because it goes down to 0.1Hz. If you're looking for a good AS3340 VCO to build, I think this is it. It certainly is perfect for my synthesizer DIY project.
SCHEMATIC.
SCHEMATIC.
Below here is the new version of the schematic, with all the opamp buffer stages drawn in. All the outputs are buffered and the same with the PWM input. (PWM = Pulse Width Modulation for the squarewave) So a total of 4 buffer stages are used here, all housed in one IC, the TL074. Now, it's not necessary to actually buffer the 3340 outputs because they are already buffered inside the chip itself but we use the TL074 to get all the different output levels that the 3340 produces into line and make them all the same voltage level.
Each output opamp is wired in such a way that it outputs the waveform at 0 to +10 Volt (when using +/-15V powersupply). For the quad opamp chip you can also use a TL084 or an LM324 or any other low noise quad opamp with the same pinout. I did not include any de-coupling caps in this schematic but they are included in the stripboard layouts.
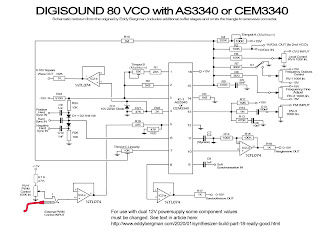
Here is a link to the Datasheet of the AS3340: ---CLICK HERE---

The stripboard layout I made from this schematic (further down the article) is verified and the placing of the buffer stages follows the numbering on the schematic drawing. For the Octaves control I used to recommend you use a 100K potmeter with a center detent, but I think after due consideration that it's better overall to use normal linear potmeters. I thought it would be useful to easily retune the VCO after you've been using the Octaves control knob and it is, but those potmeters often are not linear. Often they are logarithmic towards the center point. Anyway, decide for yourself what you want but whatever you choose use a normal 100K potmeter for the Frequency Fine control not one with a center detent because you need accuracy around the center settings.


The Bill of Materials: 


Stripboard only:

Cuts and wirebridges:


In the picture below you can see that all ground connections have been made with a bare copper wire, so only one ground wire will actually go to the ground on the stripboard. Do NOT rely on the metal of the faceplate alone to ground the sockets!! This will give you problems. Make sure all sockets are properly grounded to the stripboard like in the picture below.


I did not use the Soft Sync option. I also left out the 1V/Oct output that I use to daisy-chain VCOs together and the extra synchronization or tuner output that I put in my other Kosmo sized VCO's. There's no room for that here and I don't need it. The PWM mixer works remarkably well. You have full control over internal and external Pulse Width Modulation. The hard sync sounds great, especially the 'both' mode (middle input). It took a good 15 minutes to tune but then I had it in tune over 6 octaves at +/-8 cents over the entire range. That is a great result!


Here are the two identical VCOs side by side in my synth. You can see a 'Tuner' and 'Sync Out' output, which I added later on. More on that in the 'Synchronizing' section below:

About the CV-OUT connector:
You can see in the picture that I have CV-OUT jacks on the VCO's. These are simply in parallel over the 1V/Oct. input jack so I can daisy-chain more VCO's to one 1V/Oct. signal so that all VCO's receive the 1V/Oct signal from the Doepfer A-190-3 MIDI to CV converter. This is not included in the stripboard layouts but you can see it in the schematic drawing.
OCTAVE SWITCH:
With VCO number four I changed the Octave potmeter for an octave switch, as an experiment. I used a 10 step rotary switch and I measured out a bunch of 10K resistors so I had 10 with the same resistance upto 10 Ohm accuracy. They were all 9K99. I soldered on the resistors in the way shown in the drawing below:

So you get 5 Octaves up and 4 Octaves down with a 10 step switch. If you want -5/+5 you'll need a 11 step switch, which you can easily find on eBay. This is more than enough though.
Now, this works but it is not the case that when you turn the switch you land on the exact same note as the previous Octave. To try and address that problem I exchanged the 10K resistor connected to -15V for a 10K multiturn potmeter, with a 2K resistor in series with it, going to -15V. Now it's not possible to tune it so it is spot on but I did manage to tune it so that each octave I go up, I can turn the Fine Tune one stripe up on the dial (decal) and I'm in tune. So you switch one Octave higher, you turn Finetune to the next stripe on the dial and you're bang on. And the same but backwards for switching down the octaves. This works well enough for me :) This will really only work well if you also have a hacked Joyo tuner connected to the VCO so you can see what you're doing.
To get this bang on the right note, you would need to experiment with the 3M3 resistor and try to buffer this potmeter and use really accurate resistors. So I wouldn't advise this switch solution, as it is presented here, for any serious project where everything needs to work perfectly. I'm just documenting it here because it is something I personally tried and want to keep a record of.
Here's a picture of the switch in the panel:

The output waves:
And finally a look at the waves this oscillator puts out. All nice clean waves as may be expected from the AS3340 chip but the ringing issue in the downward slope of the squarewave, which I mention in article 2 of this build series, is still there even in this design. Although it is significantly less prominent. This ringing must be common to this chip or something. Anyway, it's not audible so no real problem. I thought the zener diode over the squarewave output resistor might help to eliminate this problem but it has no influence but you can see from the pictures below that there are only a few spikes and only on the lowest notes. The picture below shows the ringing at note C1. Only 3 spikes! They only occur on the downward slope of the squarewave and they have a frequency of 28kHz so well above human hearing capabilities. BTW, to get rid of this ringing you can connect a 1M resistor between pins 4 and 5 of the 3340 chip. This introduces some hysteresis in the squarewave but this is not implemented in the layout.

At note C3 there's only one spike left and after that it is completely clean.

Squarewave. You can see that the ringing is not even visible once you zoom out of the oscilloscope image:

Here's the ramp wave:

And this is the triangle wave:

Just for fun, here's a Triangle and a Ramp wave after being mixed together and after it's been through the dual Korg MS20 filter. You can see the high frequency resonance, produced by the filter, on parts of the wave form:

You can see that the output voltages are all around the +10 Volt except for the squarewave which is +13.4 Volt. I recently received a batch of 10 Volt Zener Diodes from China and I have soldered one in over the squarewave output and now all signal outputs are at the same 10Vpp level. Perfect! You might have wondered why there is a 2K resistor (R22) in series with the squarewave output of the AS3340. Well, it's there to make the Zener-diode work. Zener-diodes always need a resistor in series with them for them to function as voltage regulators. The zener brings down the voltage from 13.4V to 10V so there's 3.4 Volt that has to be shaven off. That voltage is dropped over the 2K resistor and that's why it's there.


ADDING A SINEWAVE OUTPUT TO THE VCO:


I put in a 47K resistor for R21 which is the pull down resistor for the squarewave output. It originally was a 10K resistor in the Digisound-80 circuit, because that's the recommended value when using the CEM3340 chip and that will work fine too. (Use 10K if you're using a CEM chip) It's stated in the datasheet for the AS3340 that it needs to be 51K but in practise it really doesn't matter at all, so I used 47K. For the current limiting resistor (R23) I put in a 1K. This is necessary because we will connect it to negative 15 Volt. It says to use a 910 Ohm in the schematics but I always play it safe and use a 1K resistor.
Use a good quality polystyrene or polyester or silver mica type capacitor for C7 (1nF). This is the frequency determining capacitor (a.k.a. timing cap) and must be stable with temperature changes. So do not use a ceramic capacitor for C7. When soldering in a polystyrene capacitor, make sure you don't heat it up too much! These types of capacitors can change their value if they get too hot from soldering and when they cool down the value will stay changed. But don't worry, with normal soldering they will be fine and I never had problems with them myself. Some polystyrene capacitors have a black line on one side. This indicates the leg that is connected to the outer layer of aluminium that makes up the capacitor. This leg should be connected to the lowest voltage potential (usually ground), that way it will act as shielding against hum. If it doesn't have a stripe, just put it in anyway you want. It'll work fine.
This is what a Polystyrene capacitor looks like. You can see that the right side, where the leg enters the capacitor, has a dark band, indicating the right leg is connected to the outer layer of aluminium:

CHANGES FOR RUNNING THIS VCO ON A DUAL 12V POWERSUPPLY:
If you're going to use this VCO with a dual 12 Volt power supply (Eurorack/Kosmo) then use a 680 Ohm resistor for R23. (On the stripboard layout R23 is the 1K resistor going from pin 3 of the AS3340 to the negative 15 Volt rail.) It doesn't matter if you are using the CEM3340 or the AS3340 ICs.
Further down this article, in the 'Tuning' section, I mention that if you experience problems with tuning while running this VCO at 12V, you can make R4 bigger. Use a 270K or even a 300K resistor instead of the 200K. Some people experienced problems because trimpot-A was at its end before the VCO was in tune. Making R4 bigger will prevent that. It's not always necessary to make this change but if you do, you may have to experiment to find a value that works best for you. It seems many people have different experiences with this but it's just a matter of finding the right value.

Temperature Compensation:


(07-June-2020 Revised version. Numbering now follows numbering on schematic.)


Cuts only, component side.
If you're going to use this VCO with a dual 12 Volt power supply (Eurorack/Kosmo) then use a 680 Ohm resistor for R23. (On the stripboard layout R23 is the 1K resistor going from pin 3 of the AS3340 to the negative 15 Volt rail.) It doesn't matter if you are using the CEM3340 or the AS3340 ICs.
Further down this article, in the 'Tuning' section, I mention that if you experience problems with tuning while running this VCO at 12V, you can make R4 bigger. Use a 270K or even a 300K resistor instead of the 200K. Some people experienced problems because trimpot-A was at its end before the VCO was in tune. Making R4 bigger will prevent that. It's not always necessary to make this change but if you do, you may have to experiment to find a value that works best for you. It seems many people have different experiences with this but it's just a matter of finding the right value.
When running this on dual 12V you might also need to lower the value of C7 from 1nF to as low as 0.5nF (or 500pF). Otherwise you might only get very low frequencies out of this VCO. This is not in the Datasheet but it has been established by feedback from many readers who built this VCO for Eurorack. Again, this change is also not always necessary but I leave it up to you. Many people commented that they needed to do this change to get it working right on 12V. Halving the value might be a bit too harsh though. In my own VCO's I changed the value to 820pF and that was more than enough. Make sure you don't use ceramic caps for C7. They are too temperature sensitive and make your VCO go constantly out of tune.
I also had feedback that mentioned changing R7 from 300K to 150K. This is the resistor in series with the wiper of the Octaves control potmeter. This will increase the range of the Octaves potmeter. Again, I'll leave it up to you whether you need this change or not. I tried it and it made the Octaves range far too sensitive. I'd go from C2 to C0 in about 20° of turn. I do not recommend this change. It's not necessary even when you run it on +/-12V.
Next thing to do is to change R18, the resistor connected to the PWM potmeter to 18K or 20K or 21K (which ever value you have to hand) to make full use of the throw of the pulse width modulation potmeter. You could even put in a 33K trimpot and then set it so that the voltage over the PWM potmeter is exactly +10V but it's not necessary to go that far. A resistor is fine as long as the value is around the 20K, plus or minus 2K.
Finally, some useful feedback I got via the LookMumNoComputer forum is to change R11 from 1M5 to 1M2. This should really help with tuning especially if changing R4 doesn't improve the tuning situation much. With all these changes you should be able to get it working fine on +/-12V.
So to sum up the changes you need to make for +/-12V operation:
- Change R23 to 680 Ohm.
- Change the Timing Capacitor C7 from 1nF to 820pF. If you still have trouble reaching high octaves or with tuning then you can use a 680pF or 500pF. Experiment and see what works for you. In my own Eurorack versions I used 820pF capacitors.
- Change resistor R4 (200K in series with Trimmer A) for a 270K or 300K resistor if you have problems with tuning (again, only if necessary. I just put in a 220K and it worked fine on 12V)
- Change R18 to 18K, 20K or 21K. This is to get the full Pulse Width range on dual 12V. This resistor is soldered straight to pin 3 of the Pulse Width potmeter.
- Change R11 from 1M5 to 1M2. This will help with tuning and if you're having problems to get the VCO to track right over the octaves. This is a change I strongly recommend!
- One extra thing: solder a 1M resistor between pins 4 and 5 of the AS3340. This will get rid of any high frequency ringing in the squarewave (see scope picture further down the article). This change is not made yet in the layouts below and not necessary for the VCO to work but highly recommended. There's place enough to put one in.
HOW TO MAKE THIS VCO A BI-POLAR VCO (+/-5V INSTEAD OF 0-10V).
The fourth (4th) version of this VCO is a bi-polar version outputing waveforms without a DC offset.
What I did to change this VCO into a bi-polar one is I replaced the 1K output resistors for the Sawtooth- and Triangle waves with 470nF capacitors to block the DC component of the waveforms. These are the 1K resistors connected to pin 14 of the TL074 and to pin 1 (in some layouts via a wirebridge).
I have done tests on this and it works fine. It was not the right approach for the squarewave though so I took a different approach for the that. I adapted the squarewave buffer opamp with an offset trimpot so you can set the squarewave to +/-5V to get a bi-polar output without the need for a capacitor. This makes the squarewave very stable even with fast changing pulse widths.
Here's a look at how I changed the Squarewave output opamp in such a way that we can introduce a negative 5V offset voltage to make the output +/-5Vpp.

It's too much work for me to adapt all the layouts to include this change but as I said I did do one layout which is the Eurorack version with all the bells and whistles, the fourth one down.
One final note on the capacitor method: The common argument against using capacitors to get rid of offset voltages is that it works as a highpass filter in combination with the input impedance of the next module the VCO signal will be connected to. This is true but most modules have inputs that go through an opamp and they have infinitely high input impedance so most of the time that problem doesn't really occur. With 470nF and an input impedance of 10K (which is very low) the cutoff freq would be 33Hz. At 1M Ohm it's already 0.3Hz so no problem at all even for very low frequency signals. That's why I chose the specific value of 470nF. You can go up to (non polarized) 1µF caps if you want to be extra sure. Btw, the VCO can NOT work as an LFO with these changes. It works from about 10Hz upwards.
Did you know that the Behringer 112 dual VCO for Eurorack is a uni-polar VCO? The squarewave and Rampwave are 0V to +10V. Only the Traingle wave is bi-polar. So it doesn't seem to matter much most of the times.
Should you want to revert back to the original state with 0 to +10V signals, all you would have to do is replace the two 470nF caps with 1K resistors and adjust the offset of the squarewave. So it's a very non-destructive method.
Further hints and tips:
The potmeter for High Frequency Tracking (or Linearity) can be a normal trimpot, not a multi-turn one. The influence it has is minimal. In fact I measured only a 1Hz change in high octaves.
But you must use multi-turn trimpots for A and B on the layout, otherwise tuning will become very difficult. All resistors I use are metal film resistors with 1% tolerance. In fact, I used cheap 1% resistors from China and they are not 1% but more like 3% but this is still good enough. But the 100K CV input resistors should all be measured and matched so they all have the same resistance value. This makes it easier when you connect different CV sources to those inputs, they will be in tune straight away. I was surprised that the two 100K potmeters I used in the panel for Octaves and for Fine Tune give exactly the range that is stated in the original description. Octaves is plus and minus 5 octaves and Fine is plus and minus half an octave. I'm not used to things actually working out as originally described in DIY projects. It's usually either a bit off or way off but the Digisound 80 designs are really good and spot on.
If I can give you one important tip, and this goes for all the projects on this website: Measure every component before you solder it in place. This can save you an enormous amount of work in troubleshooting
Before I made the bi-polar version of this VCO, I made separate quad offset boards that you could add on as a means of changing 0-10V into +/-5V. They have become more or less obsolete for this project but I'm leaving the project up on the website. It might be useful to someone.
TIP: SET YOUR OSCILLOSCOPE TO DC WHEN MEASURING OUTPUT SIGNALS!! Otherwise you'll get wrong readings and it won't measure DC offset voltage.
About Pulse Width Modulation:.
With the PWM potmeter fully counter clockwise I get 0% pulse width, meaning that there is no signal, just a flat line. Then as I turn it clockwise the pulse appears and goes through the percentages to stop at 99% pulse width when the potmeter is turned fully clockwise. So fully clockwise there's a very thin pulse left over. This is absolutely perfect. Of course your results can differ a tiny bit because of resistor tolerances but I got the same results with all 4 of my VCO's.
So if you are using this VCO with a Eurorack powersupply of +/-12V you need resistor R18 to be near to 20K. (21K or 18K will work fine I think. The schematic and layouts have all been updated with the new R18 position.)
For external Pulse Width Modulation you need a signal that goes from 0 to +10V on the PWM input jack. This can be a problem if you use this VCO in a Eurorack setting where the signals are usually -5/+5V. Just so you know. But there are LFO designs on my website that will give you the 0V to +10V output option you need. You can also use a module like the Dual Voltage Processor to give a +5V DC-Offset voltage to the control voltage and then use it for Pulse Width Modulation.
NB: If you have built this VCO and all the waves work except for the squarewave then check the voltage on pin 5 and see if it is between 0 and +5V. If not, the output will be a flat line because the Pulse Width will be set below 0% or above 100%.
SOLDER A 1M RESISTOR BETWEEN PINS 4 AND 5 OF THE AS3340. THIS WILL PROVIDE SOME HYSTERISIS TO THE SQUAREWAVE AND PREVENT RINGING.
Temperature Compensation:
Don't place this VCO directly over the power supply in your modular set-up. If it gets influenced by the heat from the voltage regulators too much it can de-tune a bit but I think this is true of almost all VCO's. The AS3340 has internal temperature compensation but this only really works for changes in room temperature. If you put it over a heat source like a power supply it will most definitely de-tune. Of course other components around the chip will also warm up and add to the de-tuning of the VCO when influenced by the heat from the powersupply heatsink.
1. KOSMO SIZED LAYOUT:
1. KOSMO SIZED LAYOUT:
Below here is the 1st layout, the dual 15V version in Kosmo size. I didn't put in the input jacks for the sync inputs or the output jacks for the wave forms and CV-OUT. It's already spaghetti junction and that would make it even worse. I assume you know how to hook up jack sockets. All potmeters are frontal view with shaft facing you. I have added 100nF decoupling capacitors directly at the power pins of the IC's and 22µF electrolytic capacitors on the power rails. These are not included in the schematic drawing but they are in the original schematic in the PDF linked below. (You can use any value for the electrolytic caps between 10µF and a 100µF as long as they are rated for 25V or over. They're used to suppress voltage ripples.)
There's an extra CV input marked on the layout. This is just incase you want to permanently connect something, like a sequencer, to the VCO and don't want to sacrifice an existing CV input for that. (If you don't need it, there's no need to include it.)
I added and extra Hard Sync input to this layout recently. You can install a 3 way rotary switch for the Hard Sync and have some options this way. You can also leave it out, it's up to you. (The middle hard sync input comes from the Digisound 80 VCO Deluxe schematic.)
Here's the wiring diagram. This version runs on +/-15V:

And here's a close-up of the stripboard. Don't forget to cut the copper strip underneath the 1M resistor above trimpot A. (Position A-31) The cut is difficult to see on the layout but it's there of course, otherwise the resistor wouldn't work. Also don't forget the jumpwire from that resistor to the wiper of trimpot C! (Position B-16 or 17). I made an extra layout with just the cuts and wirebridges, below.
Beware that some stripboards are sold with 56 instead of 55 holes horizontally. This layout is 55 holes wide.
Stripboard only view:

Below an overview of the cuts and wirebridges seen from COMPONENT SIDE! As always, mark the cuts on the component side with a waterproof Sharpie and then stick a pin through the marked holes and mark them again on the copper side. Then you can make the cuts with a sharp hand held 6 or 7mm drill bit. Then lightly rub the copper strips with a fine grain sandpaper to de-burr the holes.
Cuts and wirebridges:

Bill of Materials.

(07-June-2020 Revised version. Numbering now follows numbering on schematic.)
2. EURORACK SIZED VERSION.
This version is the same as the above only for dual 12V and the components are packed tighter together so the stripboard is only 40 holes wide which will make it fit behind a 14hp Eurorack panel.
A few resistor changes for use with a dual 12V powersupply have been made in this layout! The timing capacitor C7 is the same 1nF as in the 15V version but in my build (further down the article) I used a 820pF cap. Make sure it's a good quality capacitor not a ceramic one. R11 was changed from 1M5 to 1M2, R23 was changed from 910 (or 1K) to 680Ω. All the other changes I mention at the top of the article I left out to see if they were really necessary. In this case they weren't.
I also made a Eurorack layout which includes an alternative version for the Pulse Width Modulation input. You can input an external pulse width Control Voltage and still use the internal PWM potmeter too. Both CV's are summed in an opamp before being input in the AS3340 chip. That's version 4 further down.
Wiring diagram. This version runs on +/-12V.:

Stripboard only:

And the cuts and wirebridges.

Mark the cuts first with a Sharpie on the component side and then stick a pin through the marked holes and mark them again on the copper side. Then cut away the copper at the marked positions with a sharp hand held 6 or 7mm drill bit.


3. KOSMO SIZE with ALTERNATIVE PWM INPUT.
The 3rd version which is for dual 15V and large sizes (Kosmo size). I've had a request for an alternative solution for the pulsewidth modulation inputs. This person wanted to be able to have the pulse width connected to an LFO and still be able to control the pulse width on the panel as well. So I designed a little CV-mixer stage as an alternative for the standard PWM inputs. It requires an extra opamp but there is just enough room for that on the stripboard:

Here's the total view layout for this alternative version:

Stripboard only. The version as shown here runs on +/-15V. If you want to run it on +/-12V you need to make the same changes as the previous ones. The timing capacitor C7 goes from 1nF to 820pF. Make sure it's a good quality capacitor not a ceramic one. R11 changes from 1M5 to 1M2, R23 changes from 1K (or 910Ω) to 680Ω.
These changes are not implemented in this layout, only in the eurorack layouts.

I tested this PWM setup in the Eurorack version below and it works perfectly. Make sure you make the extra cuts and wirebridges etc. I made an extra layout to help you with this:

Bill of materials for the above version with Pulse Width Modulation CV-mixer:

Schematic for this version:

4. EURORACK SIZED BI-POLAR VERSION with ALTERNATIVE PWM INPUT MIXER.
I decided I had to also make a Eurorack version which of course runs on dual 12V and that includes the above mentioned alternative pulse width modulation input mixer and I decided to make this a Bi-Polar version. So below is a layout that fits behind a 14hp Eurorack panel and includes the PWM mix input and the squarewave offset function so you can trim it to be bi-polar and it has 470nF caps on the triangle and sawtooth outputs.
I realized that I could actually do without one opamp in the PWM mixer section and that saved just enough space to make this layout size possible. You will notice that pins 1,2 and 3 of the TL072 are not used and that opamp is tied to ground.
A few resistor changes for use with a dual 12V powersupply have been made in this layout! The timing capacitor has been changed to a 820pF cap. R11 was changed from 1M5 to 1M2, R23 was changed from 1K (or 910Ω) to 680Ω. All the other changes I mention at the top of the article I left out to see if they were really necessary. In this case they weren't. I also changed R4 to 220K instead of 200K to ease tuning. You can also use a 270K.
(Layout is verified.)
Wiring diagram:


Cuts seen from COMPONENT SIDE.
Mark the cuts first with a Sharpie on the component side and then stick a pin through the marked holes and mark them again on the copper side. Then cut away the copper at the marked positions with a sharp hand held 6 or 7mm drill bit.

And finally the Bill of Materials for this version:

SCHEMATIC:
The schematic for the above version is the same as the one in section 3 only I used one less opamp in the PWM mixer.
The schematic presented below here is for the bi-polar Eurorack version with the PWM Mixer, so the 4th version and also for the PCB version I made in KiCad. With the component values shown here, this VCO runs excellently on +/-12V. It was very easy to tune too.
(This is an updated schematic as of the 13th of November 2025. The previous version had the wiper of the Octaves Potmeter grounding switch connected to the potmeter instead of the circuitboard which can cause short circuits when the potmeter is fully open.)

I added an offset trimmer so the squarewave can be trimmed to +/-5V instead of 0-10V. I used 470nF capacitors in series with the Triangle- and Sawtooth wave outputs to make them bi-polar too.
I also added a 1M resistor between pins 4 and 5 of the 3340 chip. This will prevent any weird ringing on the squarewave as shown in the scope screenshots below. This resistor is not in the layouts but can be easily added.
The bi-polar version can not be used as an LFO. It only works from about 10Hz upwards.
Before I had the PCB's I started building this version for myself on stripboard because I could use an extra VCO for my Eurorack system and of course I want to test these new layouts so I can verify them myself. I wired it all up and I can tell you that this layout is verified. It works like a charm. :)
Mind you, this stripboard version in the picture below is not bi-polar. It's 0-10V. But you can easily adapt it.

Faceplate all stocked ready for wiring up. It is 14hp wide (7cm) and the depth, when it was all finished, came to 4CM:


The finished product.

I used a 820pF polystyrene capacitor for C7 to be on the safe side when it came to tuning and this worked out really well.
At first I just labelled the faceplate but I later made a new one this time using waterslide decals for the first time ever for me. It looks really good in the picture but this was my first try using this technique so there are some creases and it's a bit rough. So I still have some learning to do on this subject but the first result is encouraging.

THIS CONCLUDES THE DIFFERENT VERSIONS AND WE NOW CONTINUE DISCUSSING THE VERSION I BUILT FOR MY OWN MODULAR SYNTH.
(The normal Kosmo sized VCO version 1)
Below is a look at the finished stripboard. I soldered on a little copper eye to make mounting the stripboard on the particular panel I made easier, but there's room enough left on the stripboard to drill a few holes to mount it however you like. Make sure the copper traces are cut so no contact is made with the screw and nut etc. In this picture you can also see the annoying little circle at the bottom of the AS3340 chip. Do NOT mistake this for the pin-1 indicator, and put the chip in the wrong way as I once did!! I had the chip mounted in the socket the wrong way around and had it switched on for about 20 seconds. It got so hot that I could smell it, that's what allerted me, and I switched it off immediately thinking the chip would be waisted but no, it survived! (They call that 'burning in the chip', LOL. DON'T TRY IT!)

Here are the two identical VCOs side by side in my synth. You can see a 'Tuner' and 'Sync Out' output, which I added later on. More on that in the 'Synchronizing' section below:

About the CV-OUT connector:
You can see in the picture that I have CV-OUT jacks on the VCO's. These are simply in parallel over the 1V/Oct. input jack so I can daisy-chain more VCO's to one 1V/Oct. signal so that all VCO's receive the 1V/Oct signal from the Doepfer A-190-3 MIDI to CV converter. This is not included in the stripboard layouts but you can see it in the schematic drawing.
If you use the Dual Buffered Multiple described on this website, then you don't have to include this CV OUT and you can spread the 1V/Oct. signal over all VCO's with the Multiple. But I do advise to include it. If you daisy-chain your oscillators like this you keep the Buffered Multiple free for other functions and you can daisy-chain upto 8 oscillators of this design before you'll get a slight drop in voltage in the 1V/Octave signal.
MIDI to CV converter, the Doepfer A-190-3V:
In order for the VCO to produce actual notes we need to feed it with a control voltage that follows the 1Volt per Octave standard. For that we need a converter that turns the MIDI signals from a keyboard into a 1V/Oct CV signal. You can of course use a keyboard that outputs CV signals like the Beatstep Pro or Keystep from Arturia but I assume you want to add a real MIDI converter to your setup.
In order for the VCO to produce actual notes we need to feed it with a control voltage that follows the 1Volt per Octave standard. For that we need a converter that turns the MIDI signals from a keyboard into a 1V/Oct CV signal. You can of course use a keyboard that outputs CV signals like the Beatstep Pro or Keystep from Arturia but I assume you want to add a real MIDI converter to your setup.
Now, you can build a MIDI to CV converter yourself but I didn't trust myself to build one and I wanted the interface between the keyboard and the synthesizer to be absolutely fool-proof and reliable. So I bought my first Eurorack module: a DOEPFER A-190-3 MIDI to USB and CV converter and it was certainly worth the €130 I paid for it. You can connect any keyboard, that has a 5 pin MIDI output, to it and it will output a 1V/Octave Control Voltage. It adds a Portamento (or Glide) function to the synth and besides the normal CV out it has 3 extra outputs for the modulation and pitch-bend wheels on the keyboard that you can connect to CV-2 for instance to get pitch-bend. It also has a Velocity output and a 'Learn' option on CV-4. It will assign CV4 to any mod wheel or knob that you touch on the keyboard. And it also has a USB input so I can connect the synth to my computer. Naturally it also produces a Gate signal for the Envelope Generator. The voltage of all the outputs can be set with jumpers on the circuit-board. I got the A-190-3V which is the Vintage edition which means the panel is black with white lettering to stay in keeping with the other panels in my synth. It's only 5 more euro's than the normal silver edition. I just made a 20cm high panel and cut a Eurorack sized hole in it. I first made it from cardboard so I could easily adjust the size of the hole and when it was ready I transferred it to an Aluminium panel and mounted the Doepfer in there. Then I made a special adapter cable to go from the Eurorack power system to the one I invented for my own synth. (See powersupply article).
I now also have the original Mutant Brain from HexInverter which can be re-programmed via MIDI to be polyphonic (which I have done). These original versions are no longer available and the Mutant Brain is now made by Erica Synths but that version can not be re-programmed.
OCTAVE SWITCH:
With VCO number four I changed the Octave potmeter for an octave switch, as an experiment. I used a 10 step rotary switch and I measured out a bunch of 10K resistors so I had 10 with the same resistance upto 10 Ohm accuracy. They were all 9K99. I soldered on the resistors in the way shown in the drawing below:

So you get 5 Octaves up and 4 Octaves down with a 10 step switch. If you want -5/+5 you'll need a 11 step switch, which you can easily find on eBay. This is more than enough though.
Now, this works but it is not the case that when you turn the switch you land on the exact same note as the previous Octave. To try and address that problem I exchanged the 10K resistor connected to -15V for a 10K multiturn potmeter, with a 2K resistor in series with it, going to -15V. Now it's not possible to tune it so it is spot on but I did manage to tune it so that each octave I go up, I can turn the Fine Tune one stripe up on the dial (decal) and I'm in tune. So you switch one Octave higher, you turn Finetune to the next stripe on the dial and you're bang on. And the same but backwards for switching down the octaves. This works well enough for me :) This will really only work well if you also have a hacked Joyo tuner connected to the VCO so you can see what you're doing.
To get this bang on the right note, you would need to experiment with the 3M3 resistor and try to buffer this potmeter and use really accurate resistors. So I wouldn't advise this switch solution, as it is presented here, for any serious project where everything needs to work perfectly. I'm just documenting it here because it is something I personally tried and want to keep a record of.
Here's a picture of the switch in the panel:

The output waves:
And finally a look at the waves this oscillator puts out. All nice clean waves as may be expected from the AS3340 chip but the ringing issue in the downward slope of the squarewave, which I mention in article 2 of this build series, is still there even in this design. Although it is significantly less prominent. This ringing must be common to this chip or something. Anyway, it's not audible so no real problem. I thought the zener diode over the squarewave output resistor might help to eliminate this problem but it has no influence but you can see from the pictures below that there are only a few spikes and only on the lowest notes. The picture below shows the ringing at note C1. Only 3 spikes! They only occur on the downward slope of the squarewave and they have a frequency of 28kHz so well above human hearing capabilities. BTW, to get rid of this ringing you can connect a 1M resistor between pins 4 and 5 of the 3340 chip. This introduces some hysteresis in the squarewave but this is not implemented in the layout.

At note C3 there's only one spike left and after that it is completely clean.

Squarewave. You can see that the ringing is not even visible once you zoom out of the oscilloscope image:

Here's the ramp wave:

And this is the triangle wave:

Just for fun, here's a Triangle and a Ramp wave after being mixed together and after it's been through the dual Korg MS20 filter. You can see the high frequency resonance, produced by the filter, on parts of the wave form:

You can see that the output voltages are all around the +10 Volt except for the squarewave which is +13.4 Volt. I recently received a batch of 10 Volt Zener Diodes from China and I have soldered one in over the squarewave output and now all signal outputs are at the same 10Vpp level. Perfect! You might have wondered why there is a 2K resistor (R22) in series with the squarewave output of the AS3340. Well, it's there to make the Zener-diode work. Zener-diodes always need a resistor in series with them for them to function as voltage regulators. The zener brings down the voltage from 13.4V to 10V so there's 3.4 Volt that has to be shaven off. That voltage is dropped over the 2K resistor and that's why it's there.
I made a little demo video showing the main features of this VCO. Sorry it's not very good, speech is not loud enough. Don't be fooled by the scope image, the signal really is 0 to +10Vpp but the scope measures the VCA output and that is -5/+5V. The VCA is also the cause for the slight rounding in the saw- and triangle waves. You can not hear that in the sound though. The VCA works fine. Btw, this video was made before I added the Sinewave option so that is not demonstrated here.
One other thing: Please keep in mind that this project and this demo video were made in the early stages of my synthesizer building career (around early 2020) and thus I was not yet fully aware of everything you could do with a VCO in terms of using Synchronization and FM Modulation so therefore this demo is a bit basic. I never got good at making demo videos as you'll notice when you explore more projects on this website ^____^
Here's another video not by me demonstrating this VCO:
TUNING THE VCO:
This VCO has 3 trimpots for tuning but we're only going to use 2 because the High Frequency Tracking or Linearity potmeter is not really effective for the lower octaves. So we leave that in the middle position. I have developed a tuning procedure of my own that is very simple and will get this VCO in tune over many octaves in less than 15 minutes.
If you don't have a useful tuner for calibration purposes but you do have a smartphone then I recommend you download the 'Universal Tuner' app by Dmitry Pogrebnyak. This app can tune anything. Set it to the Chromatic Scale for tuning VCO's. It's available in the Google Play store for free. I personally use the Airyware Tuner a lot. This is an app on Android (and iPhone I think) and it is even used in the Rhodes factory to tune their electric piano's. Get the paid version, it's cheap and feature rich. I use it to tune my Bass guitar too. Of course any tuning app that displays frequency and notes will do. There's plenty to choose from. Anyway........... where was I?
If you don't have a useful tuner for calibration purposes but you do have a smartphone then I recommend you download the 'Universal Tuner' app by Dmitry Pogrebnyak. This app can tune anything. Set it to the Chromatic Scale for tuning VCO's. It's available in the Google Play store for free. I personally use the Airyware Tuner a lot. This is an app on Android (and iPhone I think) and it is even used in the Rhodes factory to tune their electric piano's. Get the paid version, it's cheap and feature rich. I use it to tune my Bass guitar too. Of course any tuning app that displays frequency and notes will do. There's plenty to choose from. Anyway........... where was I?
Before we start tuning, turn the Coarse Tune or Octaves potmeter off with the switch on the panel and set the Fine-Tune potmeter in the middle position. In the original text the wire connected to the wiper of the Fine Tune potmeter is de-soldered, but I recommend just leaving it in the middle position. Now turn the two trimpots all the way to one side until you hear it clicking. That means it's at the end. It doesn't matter which way you turn. Take a little screwdriver and turn trimpot A up about 3 quarters of the way (that's 22 out of 30 turns). Now go to trimpot B and turn that up about 1 quarter of the way (That's about 7 turns. It's not necessary to be accurate with this and it also doesn't matter which way you turn them. It's just for setting a start position.)
If you want to be extra precise then let the VCO warm up for 15 minutes after turning it on so it can reach its normal operating temperature, before starting to tune it.
- Launch the Universal Tuner app. on your smartphone or use the tuner of your preference.
- Open up the 'Gain' potmeter on your VCA so you get continuous sound.
- Now press key C5 on your keyboard and turn Trimpot A until note C5 is in tune on your tuner.
- Now press key C2 on your keyboard and turn Trimpot B until C2 is in tune.
- C5 will now be out of tune again so press key C5 and retune it with Trimpot A.
- Now C2 will be out of tune again so press C2 and retune it with Trimpot B.
- Repeat these steps over and over until the VCO is in tune.
- You'll notice that you will need to turn the potmeters less and less to reach the C notes. After a few cycles of tuning they will be spot on their respective C notes.
- If you find that you need to turn the trimmers more and more to reach the C notes then switch potmeters and use A for C2 and B for C5
- Launch the Universal Tuner app. on your smartphone or use the tuner of your preference.
- Open up the 'Gain' potmeter on your VCA so you get continuous sound.
- Now press key C5 on your keyboard and turn Trimpot A until note C5 is in tune on your tuner.
- Now press key C2 on your keyboard and turn Trimpot B until C2 is in tune.
- C5 will now be out of tune again so press key C5 and retune it with Trimpot A.
- Now C2 will be out of tune again so press C2 and retune it with Trimpot B.
- Repeat these steps over and over until the VCO is in tune.
- You'll notice that you will need to turn the potmeters less and less to reach the C notes. After a few cycles of tuning they will be spot on their respective C notes.
- If you find that you need to turn the trimmers more and more to reach the C notes then switch potmeters and use A for C2 and B for C5
TIP: If you are tuning more than one VCO at once, make sure they are all switched on and all other modules in your modular synth are connected too otherwise the slight voltagedrop you get when you switch them all on can de-tune your VCO(s). Have them connected to the same powersupply that you intend to use for your modular system when you are tuning the VCO(s). I made a power connector at the side of my modular synth that I can use for testing modules and it's a very useful feature.
We tune with the Octaves control switched off to prevent variations in resistance from de-tuning our VCO. Having the wiper of the potmeter exactly in the middle results in 0V on the 1V/Oct. input so that would be the same as having the wiper disconnected by the switch, but not all potmeters are perfect and that's why we use the switch. Also because a little movement of the Coarse or Octaves potmeter has a huge influence on the frequency. This is less important with the Frequency Fine control although you must make sure not to touch the fine control during tuning and make sure it stays in the 12 o'clock position during tuning.
Be precise with the final tuning. Check the exact frequencies of the C notes. The app I mentioned will display the note graphically and it shows the frequency. You can get it in tune to at least 1/10th of a Hertz although in my experience you don't have to go more than one figure behind the comma.
We tune with the Octaves control switched off to prevent variations in resistance from de-tuning our VCO. Having the wiper of the potmeter exactly in the middle results in 0V on the 1V/Oct. input so that would be the same as having the wiper disconnected by the switch, but not all potmeters are perfect and that's why we use the switch. Also because a little movement of the Coarse or Octaves potmeter has a huge influence on the frequency. This is less important with the Frequency Fine control although you must make sure not to touch the fine control during tuning and make sure it stays in the 12 o'clock position during tuning.
Be precise with the final tuning. Check the exact frequencies of the C notes. The app I mentioned will display the note graphically and it shows the frequency. You can get it in tune to at least 1/10th of a Hertz although in my experience you don't have to go more than one figure behind the comma.
Extra info for tuning on +/-12 Volt and using the V3340 chip:
As mentioned earlier, if you're running this VCO on +/-12V and you have trouble tuning it, change R4 from 200K to 220K or 270K or even 300K.
I've also had a comment on Facebook about the V3340 chip not holding tracking when used in this circuit. I have no further details on that, but just so you know. It's recommended you use either the AS3340 or the CEM3340 chip.
Here is a very interesting article that one of my readers sent to me. It deals with a tuning process for dual 12 Volt, using four trimmers which only need to be adjusted once, instead of going between two trimmers for ten or more times. I have not tested this methode but it's a very interesting approach so here's the link to the article:
As mentioned earlier, if you're running this VCO on +/-12V and you have trouble tuning it, change R4 from 200K to 220K or 270K or even 300K.
I've also had a comment on Facebook about the V3340 chip not holding tracking when used in this circuit. I have no further details on that, but just so you know. It's recommended you use either the AS3340 or the CEM3340 chip.
Here is a very interesting article that one of my readers sent to me. It deals with a tuning process for dual 12 Volt, using four trimmers which only need to be adjusted once, instead of going between two trimmers for ten or more times. I have not tested this methode but it's a very interesting approach so here's the link to the article:
https://cabintechglobal.com/tune3340
Here's a little overview of features and technical data about this VCO:
Frequency range: 0.1Hz - 50kHz
Most accurate freq range: 5Hz - 10kHz
Waveform amplitude: 0V to +10Vpp
Octave adjust control range: +/- 5 Octaves
Frequency Fine control range: +/- 0.5 Octaves
Positive- and Negative Hard Sync and Both.
Soft Sync
Linear Freq. Modulation input with level control.
Frequency range: 0.1Hz - 50kHz
Most accurate freq range: 5Hz - 10kHz
Waveform amplitude: 0V to +10Vpp
Octave adjust control range: +/- 5 Octaves
Frequency Fine control range: +/- 0.5 Octaves
Positive- and Negative Hard Sync and Both.
Soft Sync
Linear Freq. Modulation input with level control.
Optional PWM input mixer that allows you to use an external Pulse Width Modulation Control Voltage and sum that to the internal Pulse Width control so you can have an external PWM CV signal coming in and still be able to use the internal PWM control.
The other (normal) CV inputs are in fact Exponential Freq. Modulation inputs.
CV-2 input with level control. (This is an Exp. Freq. Mod. input.)
Pulse Width Modulation both internally controlled and externally controllable.
Extra CV inputs can easily be added by using 100K resistors connected to pin 15 of the VCO chip. Measure the resistance of the 100K CV input resistors and make sure they are all the same, that way anything you connect to the inputs will be in tune right away.
All outputs are protected and can be short-circuited continuously without damage to any components.
Synchronization and FM input:
Pulse Width Modulation both internally controlled and externally controllable.
Extra CV inputs can easily be added by using 100K resistors connected to pin 15 of the VCO chip. Measure the resistance of the 100K CV input resistors and make sure they are all the same, that way anything you connect to the inputs will be in tune right away.
All outputs are protected and can be short-circuited continuously without damage to any components.
Synchronization and FM input:
The positive Hard Sync synchronizes on the rising edge of a squarewave and negative H.S. on the falling edge. I'm getting excellent results with the Negative Hard Sync and Soft Sync. They all work fine and FM also gives great results. The FM input is very cool to use. I can't describe how it sounds but if you build two of these and input one into the other and you turn the Octaves control back half an octave on the oscillator connected to the inputs, you're going to get some great results. You can also input a Control Voltage from an LFO to get Vibrato or Tremelo effects. I demo this in the video.
Like I mentioned before, the normal CV inputs are equivalent to Exponential FM inputs. Try connecting the output of an other VCO to a CV input and change the octave of the input VCO upwards. Sounds pretty cool!
Finally and by request, here's a list of individual notes and their corresponding voltages, should you want to tune the VCO without a keyboard, using an accurate voltmeter. Ignore the 'Expo Output' column. It is not relevant to this VCO:


Below are some picture showing how far I've come since building my first VCO in 2019.
Finally and by request, here's a list of individual notes and their corresponding voltages, should you want to tune the VCO without a keyboard, using an accurate voltmeter. Ignore the 'Expo Output' column. It is not relevant to this VCO:

Here's a picture of VCO's one, two and three. The third one is installed at the top in the second case of the Bergman-Berlin synthesizer. I installed a Sinewave output too in VCO-3, but that was after this picture was taken. :)

(Nov. 2025) This is a Digisound-80 3340-VCO completely designed by me in KiCad 9.0. (Also see KiCad tutorial part 2) It consists of two PCB's and a faceplate. The PCB's have been made as one project with a V-groove through the middle so you can break them appart. They connect together with pinheaders.
This VCO is the best VCO I ever built when it comes to performance and tuning. I had it tuned over 6 octaves with a maximum of +2 cents deviation over 5 octaves and -3 on octave 6. It includes a slightly updated version of the triangle to sinewave converter (see below) too so it has the full 4 waveform outputs (bi-polar), all the sync options and all the FM options. So fully featured, and this project was sponsored by PCBWay so the PCB's came free ^____^


I added the Sinewave option to the VCO waveforms by adding an extra bit of stripboard with a Triangle- to Sinewave converter, the design of which I took from the schematic of the Thomas Henry VCO Deluxe which you can find in the 'Files' section of the 'Eddy Bergman Facebook Group'. It's a very simple design so only needs a small piece of stripboard. I think you can easily figure out yourself the best way to add it to your specific VCO panel. I did not use the original Digisound 80 sinewave part of the VCO because it uses a CA3080 chip and there are a lot of fakes of that chip being sold. Anyway I tested that design and could not get it to work.
The Triangle- to Sinewave converter needs a Triangle input wave of +/-5Vpp.
If you only have a 0-+10V Triangle wave available use the 1µF cap on the input to filter out the DC offset.
I changed the design a bit to work well on +/-12V.
I altered the feedback resistor (Rf on the layout) from 10K to 15K to get the amplitude correct with the other waveforms of the VCO. I did the same with the 10K from pin 3 to ground, that's a 15K too now. This brings the amplitude up nicely. If it's still too low for your taste than use 18K's.
You should make sure the other two 10K's are matched and the transistors should also be matched. (Match them on hfe, that's good enough). Put a 1K trimmer between the 10K's at the top with the wiper connected to +12V so you can regulate offset.
The output amplitude on a dual 12V powersupply is +/-4.2Vpp or 0 to 9.4Vpp. For a dual 15V power supply it is +/-5Vpp or 0 to 10Vpp.
Below 30Hz the sinewave does become a bit misformed; the wave will look like it bends a bit to the right. That's because the triangle wave at that frequency becomes more like a sharkfin wave because of the capacitor in the output. Anyway, it's not a problem and it only occurs at the lowest frequencies, below 30Hz,
Here's the layout of the Tri to Sine converter I installed in my VCO:

Triangle to Sinewave converter built into the VCO. This was my experimental stripboard so there's two TL072 opamps on there instead of the single TL074. As you can see, the VCO trimpots are still accessible:

Here's the schematic drawing. Should you have a little offset voltage on the sinewave output then you can use the 1K trimmer at the top to trim that away. The part of the schematic in the red box is an output for 0V to +10V waves. If you don't need that you can leave that part out.

Chapter three way back at the beginning of this synthesizer build series, deals with the Triangle to Sinewave converter and I have deleted the original article text and replaced the layout with this one because this one is much better and simpler. It works like a charm. That article also has pictures of the sinewave outputs.
More extra's I added to VCO number four:
The panel I made for VCO number four is 2 centimeter less wide than the other 3 which are 10 CM wide. I included an output labelled 'Tuner' to which you can connect the JOYO Tuner after you hacked it. That is connected in parallel over the 10V Triangle output, soldered to the 5V/10V switch directly. (This is not included in any layout or schematic because it was a last minute addition to keep the normal outputs free.) As I mentioned earlier I later also added an extra output in parallel over the Squarewave output to connect the VCO to the negative Hard Sync of an other VCO so as to keep the regular output free for normal use.
Okay, that's it for this one. I hope this is useful to you. After searching for a good VCO design using the AS3340 chip it was a real relief to see that this VCO performed so well and was so easy to build and tune too. I wish I found an article like this one when I first set out to build my first VCO but now I've written one of my own I really hope it will help out all those of you who are building their own synthesizer, maybe for the first time, like me, and are looking for a good VCO design.
If you have any questions or suggestions you can go to the special Facebook Group for this website. I had to close the comment section for this article because it became too long but it is full of useful information so check through it and maybe the answer to your question is already in there. Otherwise, like mentioned before, you can post your question on the Facebook Group.
Okay, that's it for this one. I hope this is useful to you. After searching for a good VCO design using the AS3340 chip it was a real relief to see that this VCO performed so well and was so easy to build and tune too. I wish I found an article like this one when I first set out to build my first VCO but now I've written one of my own I really hope it will help out all those of you who are building their own synthesizer, maybe for the first time, like me, and are looking for a good VCO design.
If you have any questions or suggestions you can go to the special Facebook Group for this website. I had to close the comment section for this article because it became too long but it is full of useful information so check through it and maybe the answer to your question is already in there. Otherwise, like mentioned before, you can post your question on the Facebook Group.
Share this article with your friends and follow this blog to keep informed of new posts. There are buttons for sharing on social media right below here.
Thank you for checking my website out and see you on the next one! :)
Here is a link to the original PDF file with all the text and schematics and tuning procedures for the Digisound 80 VCO: <click here to download or read the PDF file>
Thank you for checking my website out and see you on the next one! :)
Here is a link to the original PDF file with all the text and schematics and tuning procedures for the Digisound 80 VCO: <click here to download or read the PDF file>
PLEASE CONSIDER DONATING.
If you find this content helpful, please consider donating to keep this website in the air and to contribute to future projects. There's a Ko-Fi donation button underneath the main menu if you're on a PC or Mac. Otherwise use this PayPal link to cut out the middle man. Thank you very much for your help!
COMMENTS CLOSED FOR THIS ARTICLE. Please comment in an other article or on the Eddy Bergman DIY Projects Discussion and Help Facebook group. The comments under this article have become so numerous that it was becoming impractical so I decided to close it. Sorry for the inconvenience. But they are a good source of information so read through them if you have any problems with the build. One other thing that came up recently: people trying to friend me on Facebook with a profile that is only a few minutes old with no pictures or info on it, get blocked by me for security reasons. If you have no FB, please use the comments of an other article to ask me questions.


